Pages

Wednesday, February 6, 2013

Unattended roving + cat = WET WOOL!

Note to self, and others.  Never leave your roving unattended when there is a naughty kitty about.  I turned my back to my roving for 2 minutes, and Oreo decided to rub his slobbery face all over it!  My roving is hanging to dry now.  


Edit:  I wanted to add that I was able to salvage the salivated yarn.  I soaked it in some vinegar water and rinsed.  Dried it on my clothing rack.  It's much fluffier now than it was pre-washed, but at least I can still spin it up.  

Sunday, February 3, 2013

Yarn IS better than Football!

That's right!  You  heard me.  YARN IS BETTER THAN FOOTBALL!  I plan on spending my afternoon knitting and spinning, and not watching the Super Bowl.  :)

Here's my latest hand-spun  yarn!


Meet "Southwest Splendor!"  100% Corriedale.  I have already mentioned in previous posts about my process with this yarn, but here's a refresher.

From this:  "Birds of Paradise" hand-dyed roving.
I used only orange and purple Wilton's food gel coloring, and it produced many different colors!
2 bobbins of my roving spun

My 2 bobbins plied together.

Very pleased with how this yarn turned out!  It's the most yardage I've made so far, 274.4 yards.  2 plied.  I love how many different colors evolved from just using 2 shades of food coloring.  It was also very satisfying to go from a roving that I dyed myself, to a yarn I spun myself, and will now knit it into something.  Being a part of the process is quite special.  

Sunday, January 27, 2013

What a great way to spend a Sunday

Today has been a relaxing day of knitting and spinning.  Perfect way to spend a Sunday, really.  I woke up early this morning to go to my friend's house for a little knitting meetup.  It's been a while since we've been able to knit together, so I very much enjoyed this morning.  I made quite a bit of progress on my Metamorph cowl, which I'm very pleased about.  I'll get some pictures of that uploaded soon.

This afternoon, I have taken some time to finish spinning my hand-dyed Corriedale roving.  


This is what it looked like when I started out. 
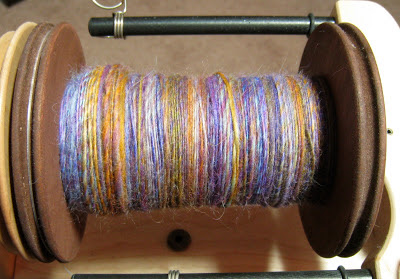
First bobbin full!  

The 2nd bobbin that I just finished.  

I'm really amazed at how this turned out, considering I only used 2 colors of Wilton food coloring to dye it!  Letting them rest now, and hoping to get it plyed tomorrow.  Will post pictures of finished yarn later this week.   


Friday, January 25, 2013

Just Keep Knitting, Just Keep Knitting

You've probably seen the movie "Finding Nemo," and if you haven't, you should!  :)  In the movie, Dori, voiced by one of my favorite women, Ellen Degeneres, says "Just keep swimming, just keep swimming" to Nemo's Dad.  I'm sure I'm not the first person to change that mantra to "Just keep knitting, just keep knitting."  

This mantra has served me well with my current knitting project, Metamporh Cowl.  For some reason, it took a while for my brain to wrap around how to do the Brioche stitches in the round.  I could do them on a flat swatch, with ease, but doing them in the round, using 2 colors, that really stumped me for a while!  I frogged this project at least 7-8 times.  But I was determined NOT to give up!  

With the help of a friend and the author of the pattern, it finally clicked in my head the other night and I figured out what I was doing wrong.  I seriously had one of those light bulb on moments in my head, and I nearly jumped for joy!  It truly made my night to be able to move forward on this cowl.  Once I got past the snafu, I've been able to make quite a bit of progress today.  

If you are not on Ravelry, you can view this YouTube video from the author of the pattern.  It shows you all the ways you can wear Metamorph!  It's quite versatile.  


Here's my progress report on mine.  I'm using the Knit Picks Bare Superwash wool and nylon yarn that I hand dyed using Greener Shades Dyes.  The cowl will be reversible, but this is my favorite side so far.  The colors are coming together so beautifully!  

I encourage you to "Just keep knitting, just keep knitting" when you become stumped on patterns.  Don't give up!  It's so rewarding when it all clicks.   


Sunday, January 20, 2013

No I'm not crazy, you CAN spin cat fur!

I've said for years that I would LOVE to be able to spin Oreo's fur into luxuriously soft yarn to knit.  When combing him, I use to save his fur in a ziplock, in hopes that I would be able to figure out how to do it on my spindle.  My husband thought it was crazy, but whatever, I did it anyways.  Since our move, I'm not sure what happened to that ziplock, but I digress.

Not long ago, I saw a book in my local yarn store called Crafting with Cat Hair by Kaori Tsutaya.  Seriously, a whole book devoted to using your cat's hair for craft projects!  I added the book to my Amazon wishlist and decided that at some point, I would buy it, brush down Oreo, and get crafty with his black and white fur.

Not only are there books on this, there are also groups on Ravelry!  A Feline Twist-Spinning Cat Hair  and Spinning from Pets and Plants are just a few I've found so far.  Information on spinning cat fur, YES PLEASE!  When I told my husband about these groups on Ravelry, he said "You just bought a spinning wheel so you could spin Oreo's fur, didn't you?"  Not entirely, but a little guilty as charged there honey.

Guess it's time to start collecting his hair and, eventually, spin it up!  I'll let you know how that goes.  :)


Oreo and his kinky-curly underbelly

Saturday, January 19, 2013

Knitting Goals for 2013

Friends of mine on Ravelry have been creating knitting goal lists for this year, which prompted me to do the same.  I've learned so much over the years, but there is always more a knitter can learn, do, and improve upon.  I encourage you to make a list of knitting goals for the year if you have not done so already. 

Here are my personal knitting goals for the year:

1.  Master brioche stitch.  A friend of mine, Elizabeth, was gifted a cowl for Christmas that was made using brioche stitches.  I'd only heard the word "brioche" used to talk about bread, never knitting.  My Carry Along KAL group on Ravelry voted the Metamorph Cowl as one of our knit alongs (KAL) for January.  This cowl is so beautiful and can be made in a variety of ways.  With Elizabeth's help, I started on it yesterday and I'm really enjoying how it is turning out so far.  Besides learning the stitch, I also have a goal of creating a video to post here for others to watch and learn how to do this stitch.  The YouTube videos I've watched so far were a bit fast for me and also showed Continental style knitting (I throw, so watching this style can be confusing for me).  

**NOTE:  When I post links to Ravelry, you may not be able to follow them without joining Ravelry.  Whether you knit, crochet, spin, dye, or needle felt, I highly recommend joining Ravelry.  It's free!**

2.  Do more color-work knitting.  It's been a few years since I've done anything using color work.  The Metamorph cowl I'm doing right now is done in the round using 2 colors, however, I'd like to do more fair isle projects.  Pinterest is filled with color work ideas, and I tend to talk myself out of doing them because they look so complicated.  I know, from past experience, that fair isle isn't that complicated.  I've made a hat and a couple of toys using the technique, and I loved how they turned out.  So this year, I would really like to explore color work more.
Selbu Modern Hat
Simon Snake II
My youngest nephew, Harrison, and Sheldon

3.  Master socks.  Some knitters love making socks, others think "Why bother!"  I've been on  the "Why bother!" side for too long.  It's not that I haven't made socks before, I have!  My very first pair was done two at a time using circular needles.  I still have that pair, but don't wear them much as they are too big for me.  (Maybe I need to add "swatch more" to this goal list!)  I also made a small pair for my nephew using circular needles.  This year, I want to be able to do a sock on double pointed needles (DPNs).  I want to make a pair that I'm proud to wear and have them fit my big feet well (I'm a size 9).  

4.  Knit a new sweater.  I haven't knit a sweater since I lived in France (2008-2009).  While living there, I knitted 3 sweaters, and, unfortunately, none of them fit me well today.  I would really like to make a cardigan sweater.  I don't have any particular patterns in mind at this time, but I've been looking through Ravelry to see what catches my eye and fits my stash.

Hourglass Sweater
On Deck Pullover


Buttony Cardigan

5.  STASH BUST and to use what I spin for my knitting.  As knitters, we tend to collect A LOT of yarn.  My stash continues to grow over the years, and I find that I end up with a lot of yarn that doesn't get made into pretty things.  I would like to organize my stash this year and maybe do some overdye projects with yarn I want to make different colors, give away things I don't want anymore, and knit up yarn that I've been holding on to for years.  I also want to knit up the yarn I spin so as not to continue adding to my stash.

That's good for now. I don't like to make overwhelming lists and that way, I can always add to it if I accomplish the above early  in the year.  

Have you made a goal list for your knits this year?  Feel free to share!  

Friday, January 18, 2013

Wood finishing for beginners (or how we finished my Kiwi 2)

Pieces drying

Working on the composite wheel
In my last post, I wrote about my Kiwi 2 spinning wheel.  When I purchased it, I went for the unfinished version, which, turned into quite a learning experience for my husband and myself when we realized we were going to do have to do the finishing ourselves.  The last thing you want to do when you get your wheel in the mail is spend time finishing it!  I was so disappointed at first.  It was freezing outside, so I knew I wouldn't be able to do anything out there (which limits your options for finishing wood).  I also didn't want to be using toxic chemicals inside my home.  My husband and I began researching options online, reading blogs, Ravelry threads, forums, anything we could to find out what we needed to do.  I also contacted some of my friends who spin to get their opinions.  We found a lot of conflicting information and lots of advice, but we were still unsure what to do.

We went to our local Lowe's store and asked a guy in the woodworking department what he would recommend.  That wasn't very helpful.  The things he wanted us to use were not recommended online for a spinning wheel.  Frustrated and adding to my disappointment, I almost went with this suggestions, but my husband wasn't satisfied.  We went home without purchasing anything, and went back to researching.

The next day, we located an Ace Hardware not far from home.  We spoke with a man there about our project and asked his advice.  We were very happy to hear that he had experience in finishing wood, and he knew what products would be safe to use in our home.  He led us to two products, Minwax water-based Wood Sheen Rubbing Wax & Finish and Howard's Feed n Wax.  I purchased the Rosewood color of the Minwax, thinking it would be nice to have my whole wheel a cherry color to match some of our furniture.  The guy at the store even did a tester to show us what it would look like.  GORGEOUS!  We picked up the other items we would need and headed home in a much better mood.  

The tools we used:  1.  Plastic drop cloth.  2.  Gloves.  3.  Cheesecloth.  4.  Sticky paper.  

**Note:  We did not sand the wood prior to staining.  The guy at the Ace store told us it wasn't necessary given the type of wood we were working with.  We ran the sticky paper over the pieces to be sure there wasn't dust on them before starting, but that was it.  Simple!

The first thing we did was test the Rosewood color on a couple of bobbins.  This was a VERY smart move on my husband's part, because we learned how the Minwax worked, and realized, we didn't want to use it on the whole wheel.  It was a beautiful color, don't get me wrong, BUT it wasn't easy to put on and not have it look like paint.  It was thick, and overlapping showed very prominently.  After 2 bobbins, I headed back to the Ace and purchased the same product in the Natural color.  We decided to do all the parts in the Natural, to really allow the beautiful teak wood to shine through.  Later, I decided to go ahead and use the Rosewood on the composite wheel.  The composite wheel looked like cardboard to me, and the Natural wasn't going to do anything for it.  The Rosewood worked beautifully on the composite wood, and actually made it look more like real wood in the end.  

We did a couple of coats of the natural on all the pieces, using the cheesecloth to apply.  We let each one dry properly in between coats.  Some of the things people recommend using to finish took days to dry, luckily, the Minwax was only a matter of hours.  It really didn't smell too bad either.  I cracked a window (which was FREEZING!), but as far as smells go, it didn't bother me much.

The final touch was to add the Howard's Feed n Wax to the wood (but not on the composite wheel).  This stuff smells like orange and honey, so very pleasant to work with.  It really helped to give the wood a nice look.  I even put some on my niddy noddy (without finishing the wood first) and it turned out very nicely.  

Thought it was a bit more trouble to do the finishing ourselves, I think it was worth it.  I love how it turned out in the end!