Pages

Sunday, January 27, 2013

What a great way to spend a Sunday

Today has been a relaxing day of knitting and spinning.  Perfect way to spend a Sunday, really.  I woke up early this morning to go to my friend's house for a little knitting meetup.  It's been a while since we've been able to knit together, so I very much enjoyed this morning.  I made quite a bit of progress on my Metamorph cowl, which I'm very pleased about.  I'll get some pictures of that uploaded soon.

This afternoon, I have taken some time to finish spinning my hand-dyed Corriedale roving.  


This is what it looked like when I started out. 
First bobbin full!  

The 2nd bobbin that I just finished.  

I'm really amazed at how this turned out, considering I only used 2 colors of Wilton food coloring to dye it!  Letting them rest now, and hoping to get it plyed tomorrow.  Will post pictures of finished yarn later this week.   


Friday, January 25, 2013

Just Keep Knitting, Just Keep Knitting

You've probably seen the movie "Finding Nemo," and if you haven't, you should!  :)  In the movie, Dori, voiced by one of my favorite women, Ellen Degeneres, says "Just keep swimming, just keep swimming" to Nemo's Dad.  I'm sure I'm not the first person to change that mantra to "Just keep knitting, just keep knitting."  

This mantra has served me well with my current knitting project, Metamporh Cowl.  For some reason, it took a while for my brain to wrap around how to do the Brioche stitches in the round.  I could do them on a flat swatch, with ease, but doing them in the round, using 2 colors, that really stumped me for a while!  I frogged this project at least 7-8 times.  But I was determined NOT to give up!  

With the help of a friend and the author of the pattern, it finally clicked in my head the other night and I figured out what I was doing wrong.  I seriously had one of those light bulb on moments in my head, and I nearly jumped for joy!  It truly made my night to be able to move forward on this cowl.  Once I got past the snafu, I've been able to make quite a bit of progress today.  

If you are not on Ravelry, you can view this YouTube video from the author of the pattern.  It shows you all the ways you can wear Metamorph!  It's quite versatile.  


Here's my progress report on mine.  I'm using the Knit Picks Bare Superwash wool and nylon yarn that I hand dyed using Greener Shades Dyes.  The cowl will be reversible, but this is my favorite side so far.  The colors are coming together so beautifully!  

I encourage you to "Just keep knitting, just keep knitting" when you become stumped on patterns.  Don't give up!  It's so rewarding when it all clicks.   


Sunday, January 20, 2013

No I'm not crazy, you CAN spin cat fur!

I've said for years that I would LOVE to be able to spin Oreo's fur into luxuriously soft yarn to knit.  When combing him, I use to save his fur in a ziplock, in hopes that I would be able to figure out how to do it on my spindle.  My husband thought it was crazy, but whatever, I did it anyways.  Since our move, I'm not sure what happened to that ziplock, but I digress.

Not long ago, I saw a book in my local yarn store called Crafting with Cat Hair by Kaori Tsutaya.  Seriously, a whole book devoted to using your cat's hair for craft projects!  I added the book to my Amazon wishlist and decided that at some point, I would buy it, brush down Oreo, and get crafty with his black and white fur.

Not only are there books on this, there are also groups on Ravelry!  A Feline Twist-Spinning Cat Hair  and Spinning from Pets and Plants are just a few I've found so far.  Information on spinning cat fur, YES PLEASE!  When I told my husband about these groups on Ravelry, he said "You just bought a spinning wheel so you could spin Oreo's fur, didn't you?"  Not entirely, but a little guilty as charged there honey.

Guess it's time to start collecting his hair and, eventually, spin it up!  I'll let you know how that goes.  :)


Oreo and his kinky-curly underbelly

Saturday, January 19, 2013

Knitting Goals for 2013

Friends of mine on Ravelry have been creating knitting goal lists for this year, which prompted me to do the same.  I've learned so much over the years, but there is always more a knitter can learn, do, and improve upon.  I encourage you to make a list of knitting goals for the year if you have not done so already. 

Here are my personal knitting goals for the year:

1.  Master brioche stitch.  A friend of mine, Elizabeth, was gifted a cowl for Christmas that was made using brioche stitches.  I'd only heard the word "brioche" used to talk about bread, never knitting.  My Carry Along KAL group on Ravelry voted the Metamorph Cowl as one of our knit alongs (KAL) for January.  This cowl is so beautiful and can be made in a variety of ways.  With Elizabeth's help, I started on it yesterday and I'm really enjoying how it is turning out so far.  Besides learning the stitch, I also have a goal of creating a video to post here for others to watch and learn how to do this stitch.  The YouTube videos I've watched so far were a bit fast for me and also showed Continental style knitting (I throw, so watching this style can be confusing for me).  

**NOTE:  When I post links to Ravelry, you may not be able to follow them without joining Ravelry.  Whether you knit, crochet, spin, dye, or needle felt, I highly recommend joining Ravelry.  It's free!**

2.  Do more color-work knitting.  It's been a few years since I've done anything using color work.  The Metamorph cowl I'm doing right now is done in the round using 2 colors, however, I'd like to do more fair isle projects.  Pinterest is filled with color work ideas, and I tend to talk myself out of doing them because they look so complicated.  I know, from past experience, that fair isle isn't that complicated.  I've made a hat and a couple of toys using the technique, and I loved how they turned out.  So this year, I would really like to explore color work more.
Selbu Modern Hat
Simon Snake II
My youngest nephew, Harrison, and Sheldon

3.  Master socks.  Some knitters love making socks, others think "Why bother!"  I've been on  the "Why bother!" side for too long.  It's not that I haven't made socks before, I have!  My very first pair was done two at a time using circular needles.  I still have that pair, but don't wear them much as they are too big for me.  (Maybe I need to add "swatch more" to this goal list!)  I also made a small pair for my nephew using circular needles.  This year, I want to be able to do a sock on double pointed needles (DPNs).  I want to make a pair that I'm proud to wear and have them fit my big feet well (I'm a size 9).  

4.  Knit a new sweater.  I haven't knit a sweater since I lived in France (2008-2009).  While living there, I knitted 3 sweaters, and, unfortunately, none of them fit me well today.  I would really like to make a cardigan sweater.  I don't have any particular patterns in mind at this time, but I've been looking through Ravelry to see what catches my eye and fits my stash.

Hourglass Sweater
On Deck Pullover


Buttony Cardigan

5.  STASH BUST and to use what I spin for my knitting.  As knitters, we tend to collect A LOT of yarn.  My stash continues to grow over the years, and I find that I end up with a lot of yarn that doesn't get made into pretty things.  I would like to organize my stash this year and maybe do some overdye projects with yarn I want to make different colors, give away things I don't want anymore, and knit up yarn that I've been holding on to for years.  I also want to knit up the yarn I spin so as not to continue adding to my stash.

That's good for now. I don't like to make overwhelming lists and that way, I can always add to it if I accomplish the above early  in the year.  

Have you made a goal list for your knits this year?  Feel free to share!  

Friday, January 18, 2013

Wood finishing for beginners (or how we finished my Kiwi 2)

Pieces drying

Working on the composite wheel
In my last post, I wrote about my Kiwi 2 spinning wheel.  When I purchased it, I went for the unfinished version, which, turned into quite a learning experience for my husband and myself when we realized we were going to do have to do the finishing ourselves.  The last thing you want to do when you get your wheel in the mail is spend time finishing it!  I was so disappointed at first.  It was freezing outside, so I knew I wouldn't be able to do anything out there (which limits your options for finishing wood).  I also didn't want to be using toxic chemicals inside my home.  My husband and I began researching options online, reading blogs, Ravelry threads, forums, anything we could to find out what we needed to do.  I also contacted some of my friends who spin to get their opinions.  We found a lot of conflicting information and lots of advice, but we were still unsure what to do.

We went to our local Lowe's store and asked a guy in the woodworking department what he would recommend.  That wasn't very helpful.  The things he wanted us to use were not recommended online for a spinning wheel.  Frustrated and adding to my disappointment, I almost went with this suggestions, but my husband wasn't satisfied.  We went home without purchasing anything, and went back to researching.

The next day, we located an Ace Hardware not far from home.  We spoke with a man there about our project and asked his advice.  We were very happy to hear that he had experience in finishing wood, and he knew what products would be safe to use in our home.  He led us to two products, Minwax water-based Wood Sheen Rubbing Wax & Finish and Howard's Feed n Wax.  I purchased the Rosewood color of the Minwax, thinking it would be nice to have my whole wheel a cherry color to match some of our furniture.  The guy at the store even did a tester to show us what it would look like.  GORGEOUS!  We picked up the other items we would need and headed home in a much better mood.  

The tools we used:  1.  Plastic drop cloth.  2.  Gloves.  3.  Cheesecloth.  4.  Sticky paper.  

**Note:  We did not sand the wood prior to staining.  The guy at the Ace store told us it wasn't necessary given the type of wood we were working with.  We ran the sticky paper over the pieces to be sure there wasn't dust on them before starting, but that was it.  Simple!

The first thing we did was test the Rosewood color on a couple of bobbins.  This was a VERY smart move on my husband's part, because we learned how the Minwax worked, and realized, we didn't want to use it on the whole wheel.  It was a beautiful color, don't get me wrong, BUT it wasn't easy to put on and not have it look like paint.  It was thick, and overlapping showed very prominently.  After 2 bobbins, I headed back to the Ace and purchased the same product in the Natural color.  We decided to do all the parts in the Natural, to really allow the beautiful teak wood to shine through.  Later, I decided to go ahead and use the Rosewood on the composite wheel.  The composite wheel looked like cardboard to me, and the Natural wasn't going to do anything for it.  The Rosewood worked beautifully on the composite wood, and actually made it look more like real wood in the end.  

We did a couple of coats of the natural on all the pieces, using the cheesecloth to apply.  We let each one dry properly in between coats.  Some of the things people recommend using to finish took days to dry, luckily, the Minwax was only a matter of hours.  It really didn't smell too bad either.  I cracked a window (which was FREEZING!), but as far as smells go, it didn't bother me much.

The final touch was to add the Howard's Feed n Wax to the wood (but not on the composite wheel).  This stuff smells like orange and honey, so very pleasant to work with.  It really helped to give the wood a nice look.  I even put some on my niddy noddy (without finishing the wood first) and it turned out very nicely.  

Thought it was a bit more trouble to do the finishing ourselves, I think it was worth it.  I love how it turned out in the end!  


Thursday, January 17, 2013

My First 3 Handspun Yarns


I'm very pleased to show off my first 3 handspun yarns!

The first is a Corriedale mix roving that came with my spinning wheel.  It's very easy to spin, since it has long staple length.  The picture to the left shows my very first spin.  It's definitely on the thicker side, and not very consistent, but I think it's rather good for a beginner spinner!  


I did a 2 ply of the yarn (meaning I spun two bobbins full of yarn, then put those two together to get this).  Plying makes a stronger, more balanced yarn.  My Mom helped me get this going because I was using the on board lazy kate (later I received an external lazy kate which is much easier to use!).  We had no idea what we were doing, but after a few YouTube videos, we got it going!  It was also very hard to get use to spinning backwards, because to ply, the wheel needs to go in the opposite direction from what the yarn was spun in.  Not easy for a newbie like me!  This is definitely a bulky weight yarn and it's very "rustic".  But I love it!  


This shows my yarn on a niddy noddy.  Niddy Noddy's are used to wind yarns into skeins, and to measure yarn.  I have a 65" niddy noddy.  After winding the yarn onto the niddy noddy, I can pull it off and wash it.  Washing will set the twist and complete the yarn making process.  


This is my VERY FIRST HANDSPUN YARN!  :)  I call it "Winter Wonder."  I think it is destined to become a hat....


 This merino roving was gifted to me by a friend on Ravelry.  Merino is a bit trickier for a newbie spinner than Corriedale.  The staple length is much shorter, and I find it to be a bit sticky to work with (doesn't draft easily).  It was a great learning experience for me though, and I'm very pleased with the results.  Here's a pic of the colorful roving, all braided up and ready to be spun.


Here are my two bobbins of spun wool.  I had split the braid in half in hopes of getting an even amount of yarn on both bobbins.  This is also a great picture of my external lazy kate, which makes plying so much easier than the on-board lazy kate on my Kiwi. 


As you can see here, my spinning has become better, but not as consistent as I would like.  It was very hard getting a consistent spin with the merino.  


Here's my 2 plyed yarn!  So colorful!  It's really interesting to see how the colors mix when spinning and plying.  I've read that if you give multiple spinners the exact same roving, each one will be spun up differently.  That's so cool!


Here is my 2nd skein of handspun!  
I call it "Rainbow of Happiness".  


Last, but not at all the least, is my 3rd handspun yarn.  I started with some Blue Faced Leicester (BFL) hand-dyed roving from Frabjous Fibers (purchased at Fiberworks in Beavercreek, OH).   I had heard that BFL was easy to spin (long staple length) for newbies, and I just couldn't pass up this colorway!  BEAUTIFUL!

Spinning this BFL was much easier than the Corriedale and the Merino.  So soft, so beautiful, and check out my consistency!  Much better!  


Once again, 2 plying my yarn.  I just love how it all comes together!


Wrapped on the niddy noddy.  
I have approximately 241 yards!  


Giving my yarn a bath.  I first soak it for 20 minutes in water with a couple of glugs of vinegar thrown in. Then I rinse it, and put more water and a few drops of Planet dish washing detergent in.  I'm very careful not to agitate the yarn when washing, that way there is no risk of felting.  I let that sit for about 10 minutes or so, then rinse out again.  Then I hang it on my clothing rack to dry.  Takes about 24 hours to dry completely.
TA-DA!! My 3rd skein of handspun yarn!  This one is my favorite so far!  
I call it "Blue Lagoon of Beavercreek"


Oreo approves.  :)


Spin Me Some Yarn!

From this....


To THIS!!   

Spinning yarn is something I've been interested in doing for years.  I bought my first spindle at a fiber festival in Greencastle, IN.  At the time, I knew nothing of spinning yarn except for what a few vendors told me.  My husband, the enabler that he is, told me that it would be fun.  At that festival, I purchased an entire, raw alpaca fleece, thinking that one day, I would clean it up and spin it myself.  

I went to my local yarn store at the time, Yarns Unlimited, and purchased some roving for my spindle.  Low and behold, they even had an upcoming learn to spin class!  I registered and dreamed of spinning my own yarn to knit with.

The spinning class was great.  My teacher was quite the expert on spinning, and was patient and kind.  I learned a lot about drafting the fiber and getting my spindle to go in the right direction.  But even after taking a class, I had a difficult time with the spindle.  It was too slow for my taste, and it was just, well, wonky to use.  (Later, I found out that the spindle I have is much too big and heavy for a beginner.)  I quickly put aside my spinning ambitions and went back to knitting.  Saying to myself that one day, when my husband and I were settled, I would buy a spinning wheel and learn to spin my own yarn.

November of last year, I started thinking more about learning to spin.  Filling my days with knitting was great, but I needed something more.  I started reading about spinning yarn online, and began dreaming again of making my own yarn.  A friend of mine said to me "Life is too short to make your own yarn."  Perhaps that is true for some.  For me, I enjoy learning new things and to take a process of knitting, and trace it back to the beginning elements, well, it was just too tempting not to do it.  

Using my birthday and advance Christmas gift money, I purchased my very first spinning wheel from eBay.  I know a lot of sites tell you to test drive wheels before purchasing, but I didn't.  I did read a lot about wheels and talked to spinners on Ravelry to find out what wheel would work well for a newbie.  I chose the Kiwi 2 because it was small, portable, and, well, extremely affordable compared to most spinning wheels.  Ebay had an excellent deal where I could get the wheel, 1 lb of roving, a niddy noddy, and a high speed whorl in one package.  

When selecting my wheel, I chose an unfinished Kiwi 2 because the price was significantly lower than a finished one.  Not having any experience in wood working, I didn't think about why the wood would be finished or unfinished, and that by purchasing an unfinished wheel, I would actually have to finish it myself!  When my Kiwi came in the mail, I was so excited to put it together and get to spinning.  That excitement came to a halt when I realized I HAD TO FINISH THE WOOD FIRST!  YIKES!!!!! (In order not to write a book here, I'll save how I finished the Kiwi for another post.)  Needless to say, my husband I were able to finish the Kiwi, put it together, and I started spinning.  Watching YouTube videos helped me get started with this new craft, as I had no clue what I was suppose to do at first.  It didn't take long to figure it out.  Having had drafting lessons previously was very helpful in knowing how to prepare the roving for spinning.  I also attended a local spinning meetup where some wonderful women gave me some feedback and advice and showed me how to adjust my wheel.  (I plan on creating a video to show how to use the Kiwi since there are only a couple I've found so far on YouTube.)

My finished Kiwi 2, and Oreo
I've now completed 3 skeins of hand spun yarn!  Each one a new experience, each one a delight.  Using the 2nd hand spun I made, I knitted the cowl you see in my WELCOME post. Knitting with yarn that I spun myself is such a wonderful feeling!  To know I made that from beginning to end really gives me a sense of accomplishment.  

I've started my 4th hand spun now using roving that I dyed using Wilton's food coloring gel.


If you have never spun before, and have dreamed of doing so, I highly recommend it!  It's so soothing, hypnotic, and best of all, you can make your own personalized yarn for any project! Granted, the yarn you make the first time around will probably end up being a hat or something easy, but eventually, with time and practice, you can make all kinds of yarns suitable for your knitting projects.  :)


Wednesday, January 16, 2013

Dyeing Yarn: Hand Painting and Microwave Heat


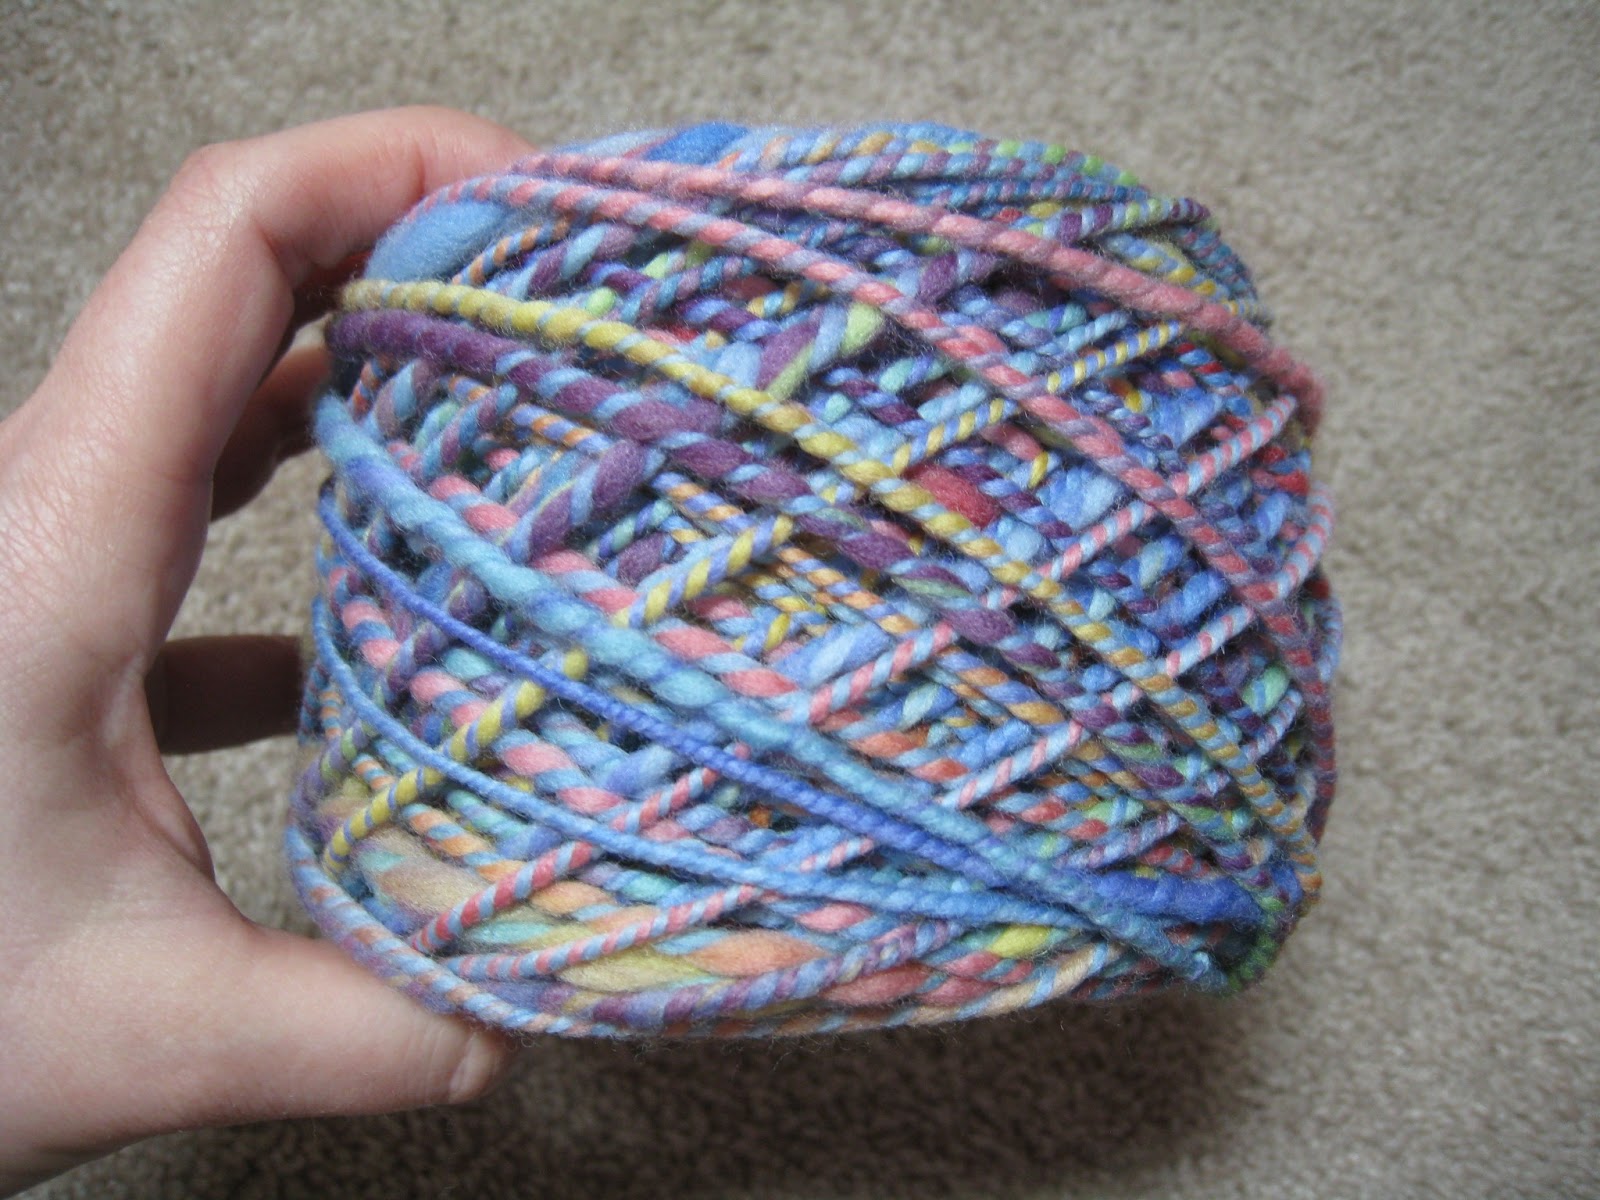
C&L Yarn Dyed by Kathryn


Yarn:  Universal Yarn Ready to Dye Collection Superwash Merino, Angora, Nylon Sock Weight. Purchased at Fiberworks in Beavercreek, OH

Dyes:  Kool Aid packets- Ice Blue Raspberry Lemonade, Orange, Cherry, and Grape.

Heat Source:  Microwave

Applicator:  Sponge brush (you can see it in the lower, right hand corner of my pic to the left)

Tools Needed:  Yarn, Kool Aid packets (at least 2 per color of your choosing), microwave, gloves, plastic wrap, jars or cups to put the dye mixture into (one for each color), sponge brush (I used one and cleaned it between colors), apron, microwave safe bowl, vinegar, dish soap (I use PLANET unscented).

Thoughts and Process:  The yarn you see above was my very first Kool Aid dye experiment.  The day I made this yarn was my estimated due date for my twin sons, so needless to say, it was a very rough day for me.  Playing with dyeing yarn on that afternoon brought some much needed joy to my sad day.  I named it "C&L Yarn" after my boys, Colin and Liam.  

I started off with preparing the yarn.  To do this, just take your undyed yarn, and put it into a bowl.  Cover it with lukewarm water and a glug or two of vinegar.  Let soak for 30 minutes.  I usually prepare my dye space while my yarn soaks.

Get your cups/glasses/or jars (I use old jam/jelly jars or Ball jars for this...I'm going to use the word "jar" from here on for consistency), and place at least 2 Kool Aid packets of each color in each jar.  


Add water to the jars of Kool Aid.  NOT TOO MUCH!  You don't want to water down your color.  Maybe start with 100-150 ml first and then go from there.  I wasn't super precise when I made this yarn.  

If you want darker colors- Use more Kool Aid and less water.
If you want lighter colors- Use less Kool Aid and more water.

Be sure to stir the packets and water together well!

Once the yarn has properly soaked, empty the water and GENTLY squeeze out some of the excess water.  You don't want it dry, but not sopping wet either.

Arrange the yarn on the plastic in a big circle.  


Then the fun begins!  PAINT YOUR YARN!  :)  You can do this however you like.  I went for a different way by putting blocks of color, randomly, all over the yarn.  You can do strips, polka dots, half one color and half the other, whatever you want!  I used a sponge brush and just block colored as I went.  The trick is getting it to soak all the way through to the back side.  I did turn mine over and redid the back, but that can lead to smudging of colors.  I've since learned that if you put the color on, and press with your gloved fingers, it will go through to the backside easier without having to turn it all over.

My husband helped a little by mixing the ice blue and orange together (if I remember correctly...don't quote me on that!) to get a moss greenish color.  The grape looks more blackish in the pic, but when it dried, it looked like your classic purple color.  

Once you are finished painting, cover the top with plastic wrap, and roll it into a jelly roll shape.  Be careful as excess water and dye can run out at this point and make a mess.  Place the jelly roll into the microwave safe bowl, and put it into the microwave.

As far as heating in the microwave, I didn't do this the typical way as most people do.  I microwaved it on for 2 minutes and off for 2 minutes for about 2-3 rounds.  By doing such a low amount of heat, I do hope that my yarn will maintain the color over time.  If I had done it longer, it may have made the colors deeper.  

I would recommend doing a total of 14 minutes in the microwave.  Microwave for 2 minutes, then let it rest for 2 minutes, heat for 2, rest for 2, until you have 14 total minutes of heat.  If you heat too much, you run the risk of cooking your yarn.  Watch your time, and be patient with the process.  Be careful not to burn yourself too!  That plastic wrap gets hot!  

Once you have finished cooking your yarn (and man your house will smell funky after that!), sit it out somewhere to cool.  Don't be tempted to unroll it just yet...again it's HOT!

Once cooked, unwrap the plastic wrap and put it back into a bowl.  Rinse it with lukewarm water and a couple of glugs of vinegar.  Don't agitate it (move it around) too much.  Depending on the yarn you are using, you risk felting it if it's moved too much.  Just gently rinse and notice if your colors are running.  They shouldn't run at this point.  If the rinse water is free of color, you did well!  If you have a little bit of color coming out, that's OK.  The vinegar will help it set more and some colors are just harder to set completely than others.  

Then rinse your yarn with more water and a couple of drops of dish soap.  I use unscented dish soap since I hate fragrance, but use what you like.  Rinse well, but again, not too much agitation or squeezing.  Be gentle.

Press out as much water as possible and then place it onto an old towel.  Gentle roll the towel up around it and press to get any excess water out.  Take your gorgeous yarn and hang it up to dry.  I use a clothing rack in my living room with a bucket underneath to catch dripping water.  You can hang yours in the bathtub if you wish.  Let your yarn dry for about 24 hours.  


That's it!  You now have your very own unique, hand-painted yarn that, if you are like me, you'll be so excited to knit up into something!  


Questions?  Comments?  Let me know.  


The Joy of Dyeing Yarn/Roving


I've been having so much fun dyeing my own yarn, and just recently, my roving.  It seems like a complicated process, but really, if you have the time and a few easy to find materials, it's easy.  There are so many different methods to do, and so far, I have only done microwave and crockpot dyeing using non-toxic dyes.  My plan is to write up more detailed descriptions of what I have dyed so far, but wanted to post a bit of a teaser for now.  

Why do I love dyeing my own fiber?  Because I can do whatever I want to do!  Always keeping in mind, though, that it may come out different than planned, and it will not be perfect.  However, I'm not striving for perfection at this point.  I just want to have fun, make colorful yarn, and enjoy the process.  

I've been choosing non-toxic dyes because (a) I am dyeing in my kitchen and dining room so I don't want toxic chemicals in my house, (b) they are easy to obtain and relatively inexpensive, (c) I'm just more of a non-toxic kind of girl.  The dyes of choice so far have been Kool Aid packets, Wilton's food coloring gel, and 
Greener Shades Dyes.  I find the Kool Aid packets at Kroger grocery store, the Wilton's at JoAnn's fabric store (they sell them in store, not online), and Greener Shades Dyes through Knit Picks.  Eventually, I would like to experiment more with natural dyes using food items and plants.
The bare yarn I dye comes from either my local yarn store, 
Fiberworks, or Knit Picks.  The roving comes from Fiberworks.  Keep in mind when looking for yarns to dye, that animal fibers absorb color better than plant fibers (like cotton or bamboo).  However, I have dyed blended yarns without problem, and as have my friends (bamboo with wool, superwash wool with nylon as just a few examples).


Tools for Dying:  As I said, the tools for dyeing are easy to find and fairly inexpensive.  **NOTE:  What you use for dying will ONLY be used for dying in the future.  Do not use something that you want to cook in later.  Keep your dye tools separate from your kitchen tools!**

Here's what I have been using (in no particular order):  
1.  Crockpot- I had an old crockpot that was my Grandma's that I use.  You can find used crockpots at the local Goodwill sometimes or thrift stores.  You could purchase one at Wal-mart or just about anywhere.  Doesn't have to be fancy...just something that has high and low temp on it.

2.  Plastic Sheet- You always want to cover your workspace (be it your counter or table) with plastic.  I found some recyclable plastic sheet at Lowe's for $5.00 or so.  I just cut it to fit my table and it works very well to protect things from the dye.  I also feel good about it because when I'm done with it (which I don't foresee that being anytime soon), I'll just toss it and know that it will biodegrade instead of taking up space in the landfill.

3. Microwave- You can dye in a crockpot, or you can use a microwave.  I've done both, but it's up to you what you want to do and what you have.  If you don't want to buy a crockpot, and you already have a microwave, then use it and save yourself some money.

4.  Dyes- Whatever dyes you choose.  See my list above for what I've been using.

5.  Plastic wrap- Seran wrap is OK, but for some reason, I find it gets hotter than the brand I typically buy at the grocery.  I prefer 
Environment Friendly Products If You Care plastic wrap.  I can buy it at my local Earth Fare grocery store.  If you are doing the crockpot method, you won't need this item.  I use plastic wrap when I'm handpainting and using the microwave as a heat source.

6.  Plastic gloves- Buy some heavy duty plastic gloves that have the long sleeves to protect your hands.

7.  Apron- Just common sense.  Don't want to get dye stuff on your clothes!  I usually wear old clothes when I'm dyeing anyways, but an apron is just added protection.

8.  Applicators- You can handpaint using 
sponge brushes **NOTE:  I like using Amazon to link products to show you what I'm talking about, but you don't have to buy these items from Amazon.  I buy my brushes from Lowe's.**, syringes (can ask for them from your local pharmacy), or small jars (I save jam/jelly jars and Ball jars) to dip into.

9.  If doing the microwave method, I recommend getting a microwave save bowl that is big enough for your plastic wrapped yarn.  I found an inexpensive glass Pyrex knock-off at Home Goods Store.

10.  Some other items that are helpful....old towels, clothing rack, tongs.

11. Vinegar!  Very important to have vinegar for dyeing.

12.  Face mask- I have 
this respirator that I purchased from Lowe's.  I only wear it when working with the Greener Shades Dyes.

Wow, a lot more things than I thought I was going to list here!  Don't feel overwhelmed by the amount of stuff on this list.  Some of it is necessary, some of it are suggested items.  Just depends on what effect you are going for and what method of dyeing you want to do.  When I write out my detailed processes later, you'll have a better sense for what items you need for different projects.  Stay tuned for my next post on Microwave Dyeing!  :)
  

Welcome!


Thank you for visiting my new blog, "The Purled Ewe."  It's been a while since I've blogged, 3 years to be exact, and I'm looking forward to sharing my passions with you.  I hadn't planned on starting a blog, nor did I plan spending most of my time knitting, spinning, dyeing yarn, and playing with needle felting.  My life was turned upside down last year with the birth and passing of my twin sons, Liam & Colin, on July 1st when I was 20 weeks pregnant.  I had already put my career as a Hypnotist and HypnoBirthing teacher to the sidelines in preparation for maternity leave, and an out of state move.  But after I lost my boys, I found that the only thing to keep my mind occupied and sane, was to knit.  

Knitting had been a passion of mine for years.  A friend of mine, Jessie, taught me while my husband and I lived in New York City.  I fell in love with knitting right away, and have been doing it ever since!  Hats, sweaters, scarves, toys, mittens, shawls, I'm always expanding my knitting horizons.  I've attempted crochet here and there, but still resort back to my knitting.  

Knitting has been very therapeutic for me after my loss.  I've since learned to dye my own yarn using Kool Aid, Wilton's food coloring, and Greener Shades Dyes.  But dyeing and knitting wasn't enough for me.  Oh no!  I had to go further back in the process and actually make the yarn myself!  I purchased a spinning wheel, a Kiwi 2 to be exact, and am now learning how to spin my own yarn.  My appreciation for wool has expanded with spinning, as I never was one to knit much with it...choosing cotton, bamboo, or baby alpaca more often.  Now I'm learning to spin Corriedale, Merino, Blue Faced Leicester, and discovering how awesome it is to spin yarn.

As I knit or spin, I dream of one day having my own yarn shop, perhaps a small farm with a few sheep, alpacas, and some pygmy goats (they are so darn cute!).  Working with fiber has brightened a very dark time in my life, and it continues to bring joy and peace to my crazy world.  I hope you enjoy my musings, pictures, stories, and videos to come.  

~Kathryn